Sous-vide has long held a certain dangerous allure for home and professional chefs alike. Partly tied its years of illegality in many restaurant kitchens and partly tied to its exotic, European provenance, sous-vide cuisine is the often overlooked cousin to long-duration cooking methods. For a real time capsule of this bad boy reputation in New York’s food scene in 2006, read this New York Times article on the plight of chefs and the Department of Health.
Since that time, sous-vide has left the domain of enterprising Michelin rated chefs and entered the home market. Lifehacker has an entire column devoted to home sous-vide cooking and sub $200 immersion circulators make the home sous-vide an expensive but within-reach hobby.
Dear reader, let’s see if we can sous-vide without a circulator and with the fewest tools possible.
To achieve the evenly cooked perfection granted through a professional vacuum sealer and immersion circulator, let’s first understand what it is.
Meat is vacuum sealed in a plastic container and cooked at a consistent low temperature in water. Cooking meat this way cuts down on the risk of overcooking and more importantly, it creates a uniform done-ness throughout the cut, unlike the uneven heating of other methods. Sous-vide cooking creates the tender, succulent profile seen in the photos here. It can also make a modest beef chuck taste like prime rib, let’s find out how to do that.


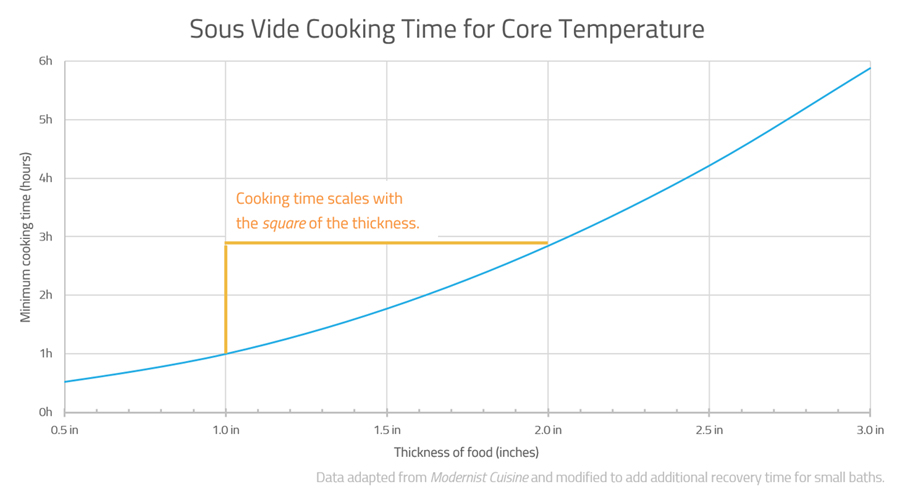
Total preparation time: Depends on thickness of your cut, chart below.
Difficulty: Moderate
Pineapples: 5/5 🍍 🍍 🍍 🍍 🍍
Read before committing: Do a test to see if your stove, pot, and thermometer setup can maintain a consistent water temperature. May be near-impossible on gas stove. Fruitman Kitchen has an electric stove. Fluctuations greater than 5 degrees Fahrenheit can prove dangerous.
Ingredients and Tools Needed
Desired cut of meat
Salt, pepper, aromatic herbs
Butter to finish
A heavy bottomed pot
A digital thermometer
A heavy duty ziploc bag
Instructions
Take your desired cut of meat, season heavily with salt and pepper, and let sit at room temperature for 30 minutes.
Place your cut of meat inside of the ziploc bag along with any aromatic herbs you like. Submerge ziploc in pot of water with just the top part out of the water. This will naturally push the air out of the bag and create a tight seal around your cut.
Place the filled ziplog bag into the pot of water.
For beef, we prefer a 130F internal temperature, so this is the temperature we will set for the water. From now, the challenge is to keep the pot of water as close to that temperature as possible.
Here in the Fruitman Kitchen, we were able to set our electric stove’s heat setting to “SIM” and were able to deduce that this setting caused the water to heat up by 2 degrees every 20 minutes. You will have to figure out your own process for this as this is the most difficult part.
Cooking time dependson the thickness of your cut, and it is an exponential rise in cooking time the thicker the cut. Our cut was 3″ thick and it took nearly 5 hours.
Once the time cooking time has elapsed, use your meat thermometer to ensure the internal temperature of your cut and that it is cooked all the way through.
Remove from the ziploc bag and let sit for 10 minutes. Heat a pan or a grill to very high heat and sear all sides with butter until golden brown for a savory crust.
Serve and be amazed!
The beef looks incredibly sad once it is out of the its bath, but it’s nothing a quick sear can’t fix.

